The Arm Swing
Watch great NHL players on a breakaway. You will notice that in these situations they often carry the hockey stick in just their top hand, even when carrying the puck. They don't attempt to control the puck; instead, they push the puck ahead of them as they race at top speed toward the opponent's goal.
In these breakaway situations, as well as when forechecking, backchecking, and skating without the puck, it is often preferable to skate holding the hockey stick in just the top hand. This allows for maximum skating speed, and encourages the proper use of the arms (forward/backward, not side to side). Keeping two hands on the stick forces players into the habit of keeping the stick off the ice and swinging their arms from side to side. I call this side to side motion "cradling the baby". Don't cradle the baby while you skate.
A famous NHL player once said, "A player who carries the stick in the air is playing for the other team."
Why? If the stick is in the air you often can't get the stick down quickly enough to take a pass. This happens all too frequently, even at the NHL level.
Another famous NHL player once commented, "I'll never pass to a teammate who has his stick in the air - I don't know where he wants the pass." Players need to have a target for their passes, and a stick waving around in the air doesn't make a very good target. Holding the stick with one hand helps you to keep the stick close to or on the ice. Of course, you must learn where on the ice to keep the hockey stick and when to put the other hand on the stick. Having the stick on the ice at all times also increases the chance that a loose might end up on your stick rather than on someone else's.
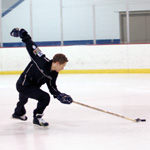
Regardless of whether you skate with the stick in one hand or two, when you skate straight forward or straight backward the arm swing is also forward and backward. Referees, who do not use a hockey stick, should learn to use the same forward/backward arm swing.
A forward/backward arm swing enhances forward momentum. A side to side arm swing enhances sideways momentum. So, when moving sideways (in hockey we call this lateral mobility), you should move your arms sideways (along the desired direction of travel).
Tips for achieving a forward/backward arm swing:
Most players understand that it's important to fully extend the legs during each stride. Because the arms and legs naturally work in unison, it's also important to fully extend the arms through each arm swing.
Finish each forward and backward swing of the arms with the elbows straight and with the palms of your hands facing upward.
Move the arms forward and backward in such a way that the elbows stay close to your ribs as they move. If the elbows stay wide as they swing your arms will be forced to move sideways rather than forward and back.
Move your arms in rhythm with and in the same line as your legs. Since the legs move diagonally (back and out, forward and in) the arm swing, when performed correctly, will translate into a diagonally forward and backward motion.
The arms should never cross the midline of your body because if they do, they will move sideways, creating sideways rather than forward momentum.
Crossovers - Edges: Why And How
Crossovers are the maneuvers used to accelerate on curves, circles and corners. They make it possible for players to weave in and out of traffic, zigzag down the ice, change direction, turn from backward to forward, and move laterally (from side to side). Powerful, fast crossovers are essential for all hockey players.
Introduction:"Crossover" refers to the passing of the outside skate (the one nearer the outside of the curve) over (in front of) the toe of the inside skate.
- Forward and backward crossovers are very similar.
- Knee bend: Ideal knee bend is a 90 degree angle, when measured between thigh and shin.
- Edges (Angulation): Skates, knees and hips press into curve or circle. Angle of engaged skate blade to the ice at speed and on sharp curves is 45 degrees.
- Upper Body: Shoulders are held level to the ice, or even slightly counter-leaned (inside shoulder higher than outside shoulder). Upper body does not tilt (lean) into the circle and the shoulders do not move around.
- Skates stay close to the ice at all times - for example, at the finish of pushes and while moving to change feet.
Edges - Why. Edges are the key both for traveling a curved path and for pushing against the ice. Contrary to popular belief, skates are NOT held straight up. When held straight up the skater rides on the "flat" of the blade (rides on inside and outside edges simultaneously). The flat of the blade is designed to travel a straight line on the ice. It is not designed to curve or to grip the ice. Therefore, when on the flat it is impossible to curve or to push.
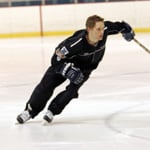
- Gliding on an edge: When the gliding skate is on an edge, the more the foot presses, the boot leans, the knee bends, and the upper body balances over the engaged skate, the sharper the curve or circle.
- Pushing against an edge: In preparation for pushing the pushing skate must dig into the ice. The more the foot presses, the boot leans, the knee bends, and the upper body balances over the engaged skate, the more effectively the skate will be able to grip the ice and the greater the potential for thrust against the ice. In forward and backward crossovers the inside edge and the outside edge are both used for gliding (as the directional skate) and for pushing (as the movement generating skate).
Edges - How. Skates and Body Must Coordinate to Achieve Edges. Crossovers require strong, simultaneous edging on both the pushing and gliding skates. The inside skate always glides on its outside edge; the outside skate always glides on its inside edge. The skates alone cannot achieve edges. The entire body must coordinate with the skates to produce effective edges.
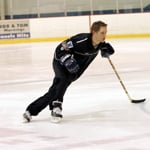
- Lower Body (skates, knees, thighs, hips): To achieve an inside edge - Lean the skate, knee, thigh and hips toward the inside of the body (and curve). To achieve an outside edge - Lean the skate, knee, thigh and hips toward the outside of the body (and curve). The angle of the knee and thigh line up above the skate (all three are at the same angle to the ice).
- Upper Body (torso, shoulders, head): Upper body must be balanced with weight concentrated over the engaged skate.
Practicing Properly: Motor learning is a long-term process. With this in mind, practice slowly and in segments, then slowly as a whole, then faster and faster, then at top speed, and same while controlling a puck. The ultimate goal is to skate correctly, powerfully and quickly, with or without the puck, when in game situations and under lots of pressure.
The Hockey Stop
The hockey stop is that sudden, flashy move that sends snow flying and has spectators gawking. It is the move that players use to "stop on a dime". Many coaches insist that when changing direction, their players should use stops and starts rather than wide turns; they feel that when properly executed, stops and starts are faster and more efficient than turns.
The hockey stop leaves players well prepared to start out either in the same or in the opposite direction.
Following are some important things to remember when executing hockey stops:
- All stops require that the skates slide or skid against, rather than cut into, the ice. Use shallow edges when stopping. The front or outside skate should be on the inside edge; the back or inside skate should be on the outside edge.
- Both skates are used to stop. Body weight distribution is usually 60% on the front (outside) skate and 40% on the back (inside) skate.
- Hockey stops involve a 90 degree change of direction. To effectively execute the hockey stop the following steps are essential:
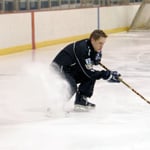
- When gliding forward in preparation for stopping, release your weight by unbending your knees.
- Now flip your hips 90 degrees (so you are facing sideways).
- Re-bend your knees deeply as you scrape the ice with the skate blades.
- Scrape the ice by applying pressure to the ice with the balls of your feet, not with the heels. The heels will dig into the ice, causing a turn rather than a stop.
- Keep your feet at least shoulder width apart as you scrape the ice and re-bend your knees.
Tight Turns
The Pivot (Tight Turn)
One of the most important agility moves in hockey is the pivot or tight turn. Wayne Gretzky was a master of this move. He used it magically to escape defenders and accelerate into open ice with the puck.
The pivot is a forward skating move in which the player executes a tight turn and emerges from it still skating forward, but in a new direction. It is an extremely important hockey move because it gives the player numerous options. It is also one of the most effective moves when trying to elude an opponent. In this instance, the attacking player wards off the opposition with one shoulder and arm while protecting the puck trying to push around and beyond the reach of the defender ("bulling").
The pivot consists of two equally divided phases: the entry and the exit. In this move the player changes direction - i.e. - from skating straight forward to making a tight turn and emerging to skate forward in another direction. The move requires very deep knee bend and edges on both the gliding and pushing legs, with proper weight distribution over the skates and proper upper body positioning for balance.
The entry phase of the pivot is done with both skates on the ice. The inside skate glides on a deep outside edge to curve while the outside skate and leg execute a forceful push (forward C-cut push) against the inside edge. The C-cut push provides drive into and through the first half of the pivot. The depth of the edges and the downward pressure of the body weight over them determine the sharpness of the pivot.
In the entry phase, the tighter the turn, the more important it is to keep the body weight over the back halves of the blades. Weight on the front halves causes the blades to skid instead of cutting into the ice.
The function of the exit phase of the pivot is to allow the player to accelerate out of the turn and skate rapidly (forward) in a new direction. This phase requires a powerful and rapid crossover (with the accompanying X push) in order to accelerate from the pivot.
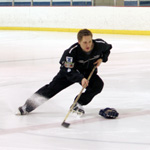
When executing a pivot, the shoulders should remain level with the ice. Often players keep the inside shoulder higher than the outside shoulder; this provides stability. Lowering (dropping) the inside shoulder causes too much lean or tilt into the circle, which at speed and on a sharp curve causes a loss of balance.
The pivot can be done either with the outside shoulder leading and the chest facing toward the center of the circle or with the inside shoulder leading and the chest facing away from the center of the circle. Practice both positions. Regardless of the position, shoulders should be held level with the ice (or with the inside shoulder held slightly higher than the outside shoulder).
The pivot can be used as a full-circle (360-degree) turn, a three-quarter-circle (270-degree) turn, a half-circle (180-degree) turn, or any part of a circle the situation demands. Players who master this maneuver have a great advantage in game situations.
For more Power Skating information, visit
http://www.laurastamm.net/Default.aspx